
Dave Hill Tutorial


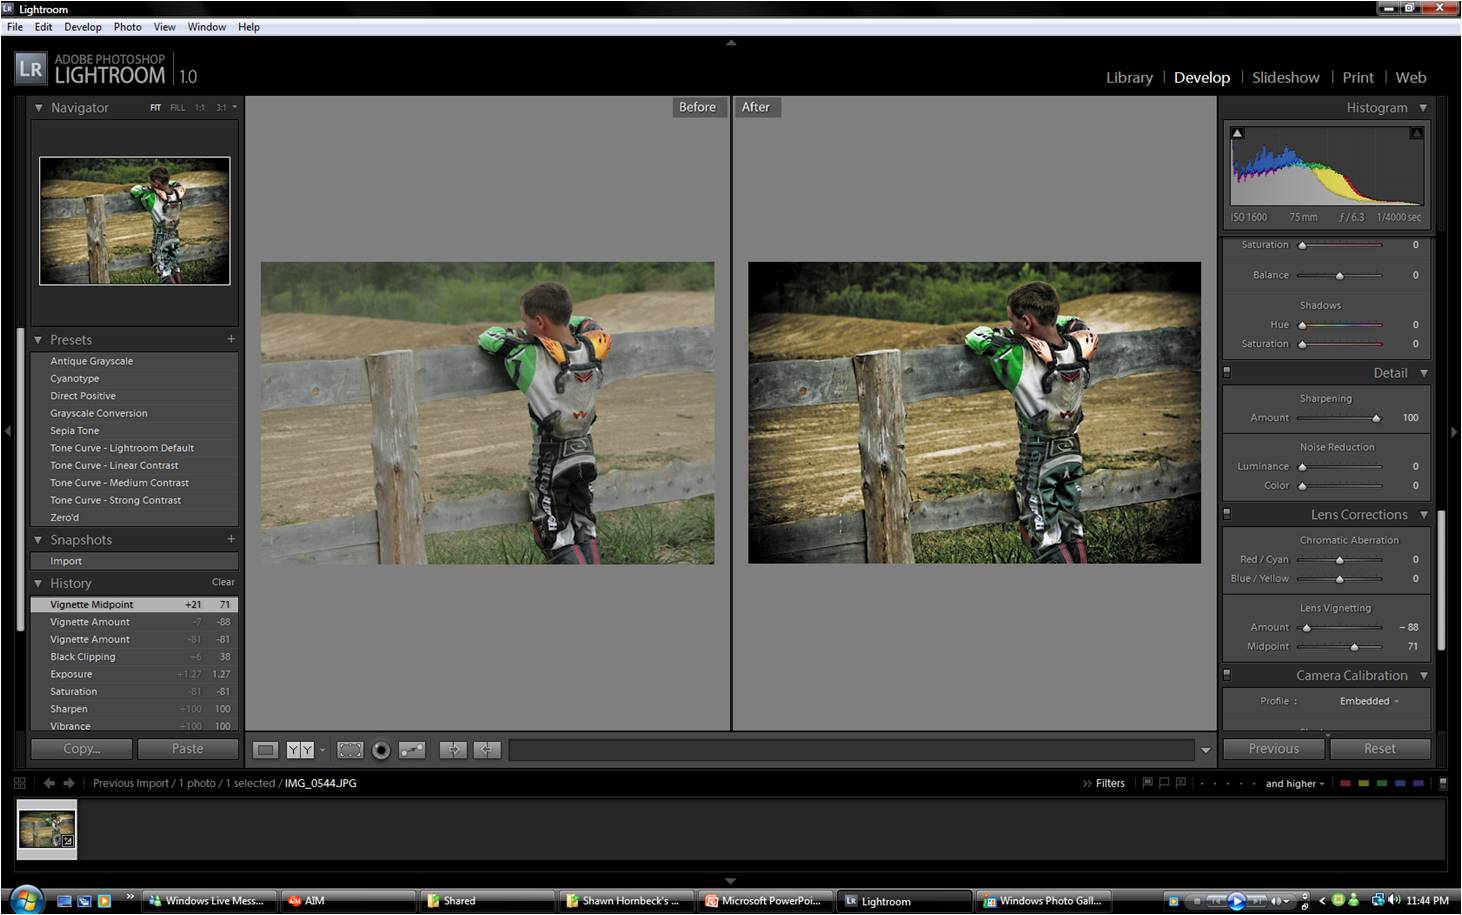
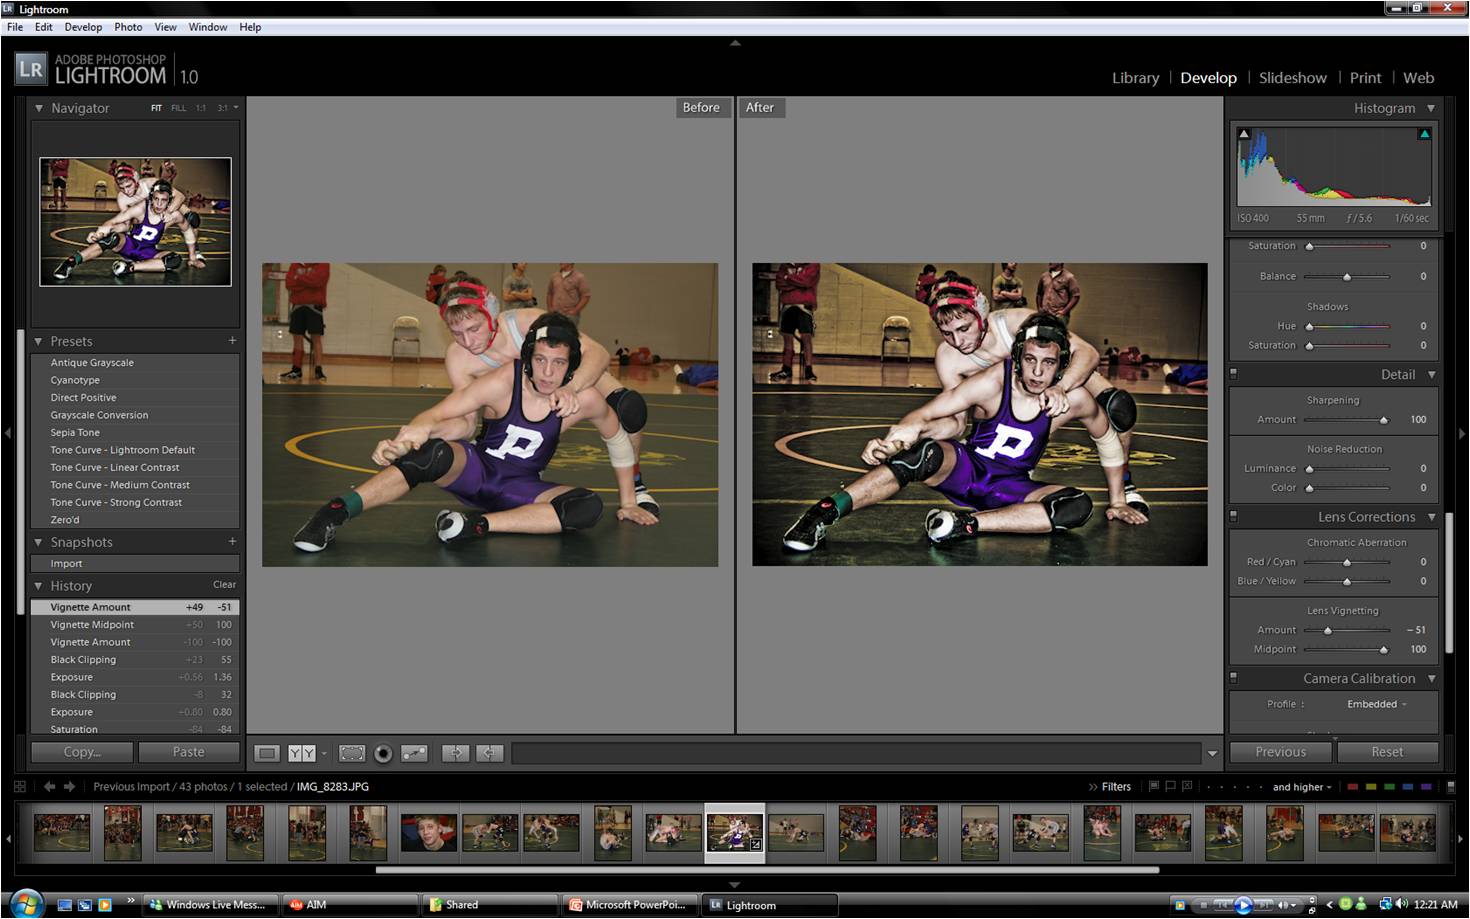 How to make your images have a hint of Dave Hill, using Lightroom:
- take recovery to 100
- take fill to 100
- add a little black for some contrast
- take contrast to 100
- take clarity to 100
- take vibrance to 100
- bring down the saturation to where you almost lose all of your color. NOT BLACK AND WHITE
- go back and play with your exposure and blacks to make the image acceptable
- add a lens vignette to the photo and now it should resemble the Dave Hill look.


I LOVE YOUR WORK! I think you are an amazing photographer! This tutorial is great and the presentation you made from it shows the most amazing work I have ever seen! GREAT JOB! Keep going and never give up!!
Could you post some examples of this technique??
Amazing!!! This one looks way better than other tutorials that I’ve seen. I’m just wondering if there’s a Photoshop CS2 version of this tutorial. Lightroom uses some different values.. (can’t make out what vibrance and presence could be when trying to manipulate in PS CS2)
[…] a cool tutorial for Adobe Lightroom to get that Dave Hill look for your photos. The tutorial is here and below are a couple of what I […]
Something like Dave Hill « wOOkiegraphy: Truth or Dare said this on January 23, 2008 at 1:35 pm |
this is really great.. thanks for sharing.. i really don’t know how to do photoshop, and this really helps.. :D:D
this is amazing
I had heard it was possible through lightroom but I never would have experimented this much to get this close of a match
anybody who could make a preset out of these?
Quite nice. See the original technique from which this is certainly inspired here: http://www.lightroomkillertips.com/
great tutorial – I use these adjustments in camera raw and then add gausian blur for silky skin.
try this for photoshop users
http://www.flickr.com/groups/strobist/discuss/72157594577686705/
Nice tutorial and great effect. Thanks.
[…] pasar y de verdad que me alegro que guste el tratamiento. Apliqu� el tutorial de Dave Hill de aqu� Dave Hill Tutorial limeliteimages y luego en PS, con mi precioso plugin color efex pro elijo primero el Bleach Bypass y ajusto un […]
Dame Ca�a UPS Car - Canonistas.com said this on August 3, 2008 at 3:37 am |
i liked to add few tips!. after doing this that matt tells open cs3 and give some gaussian blur and dodge higlights and shadows. this is actualy the way i do my photographs:) http://www.flickr.com/photos/juhanalappalainen
[…] conseguido este tutorial de un posible Dave Hill: Dave Hill Tutorial � limeliteimages Espero que le guste y sirva a alguien en este foro, mi pregunta es, usando el Lightroom donde […]
Ayuda de retoque de piel y maquillaje digital!!!! - Foro de fotograf�a - OJODIGITAL said this on September 11, 2008 at 8:02 pm |
How are you dealing with the haloing that occurs when you jump the recovery and/or fill light up to 100 in CR?
NICE NICE NICE .. !
All THANKS MR,
L O R A N C E
Well What can I say? This is easy but powerful! I love your work, it is amazing! Telling u the truth here in Gondar, small town in Ethiopia, where only few people has the chance to learn staff like this, I’m more than thankful that such kind guys like your self are out there sharing their knowledge for free…. may God repay you for this and other great things you do! God bless!
أنت إنسان صاحب ذوق عالي ..
شكراً لك (:
thnx 🙂 i like it
Check out http://www.presetsheaven.com as well. There are a bunch of Lightroom presets to use for this Dave Hill effect.
[…] chicos por vuestros comentarios. Llop, mira esto. Solo que yo lo he hecho en Adobe camara raw y despu�s us� dos filtros del plugin color efex pro: […]
Dame Ca�a Civis Train - Canonistas.com said this on November 4, 2008 at 11:27 am |
Wow!
I gotta say.. Been trying to get the Dave Hill look for quite a few weeks now, checking every tutorial and long-winded PS-recipe online.
But this actually works!!
I learned alot about how the look is achieved, just now. A lot of people keep repeating the importance of lighting. And I couldnt care less as I believed it was all in PS-postprocessing. But they were right! The only photos I succeded with were the ones with suffiscient lighting. They were taken in the sunshine and almost overexposed. With pressure on “almost”. As soon as the lighting was only “fair”. It didnt work at all..
Thanks!
wonderful …
cool! i just fine this while surfing for dave hill effects, cant wait to try it out 🙂 thanks
Great work. Nice look to the final image. I’ve been developing my own step by step tutorial in achieving what i feel is something similar to the Dave Hill look. I use Photoshop CS4, Dynamic Photo HDR and Noise Ninja to achieve the final look. See link below to pdf tutorial. it has been received with good response on both POTN and Retouch Pro. Just thought i’d share.
http://www.4shared.com/file/25560757…to_includ.html
Sorry trying to get the link to work.
If the link does not work try cut and pasting it into your browser.
http://www.4shared.com/file/255607577/7cabb37e/photo_edit_work_flow_to_includ.html
thanks a million bro!!!